
Developing your own Statamic add-on: Insights from our Cloudflare add-on creation process
- Bespoke development
Creating software that other developers can use is like sharing a favourite recipe—it's rewarding to contribute to the community and make life a bit easier for everyone. At Brew Digital, we're all about crafting tools that make a difference, and today, we're excited to introduce our latest creation: an open-source Statamic add-on that allows admins to easily purge their Cloudflare cache.
In this blog, we'll guide you through the process of crafting your own Statamic add-on, using our new Cloudflare add-on as an example. This handy tool lets you purge all domains, a specific domain, collections, and URLs with ease. Plus, it gives you the ability to clear the cache whenever an entry or term is saved.
Ready? Let’s dive in!
Getting started with creating a Statamic add-on
You are going to require the following:
A fresh installation of Statamic
Laravel Valet or Herd
To start with creating an add-on, a good practice is to have a fresh Statamic installation on your local machine. After configuring the new instance and creating a control panel (CP) user, you can log in and check if everything looks good. It is important to have that as a starting point, especially when testing custom Statamic routes. Once the instance is running, you will have to run:
You can think of an add-on as a small integration of Statamic in this case. Once you run that command, it will publish some files inside the add-ons directory that will have a basic file structure. It will include a service provider that will boot your add-on and a composer.json where you can define your add-on’s dependencies.
Managing dependencies
Statamic add-ons are automatically discovered by Statamic and they will be registered automatically. To develop the Cloudflare add-on, we should add some dependencies to our add-on. In this case, php, statamic/cms, and cloudflare/sdk. To test the add-on, in the require-dev section, we will need to add orchestra/testbench and phpunit.
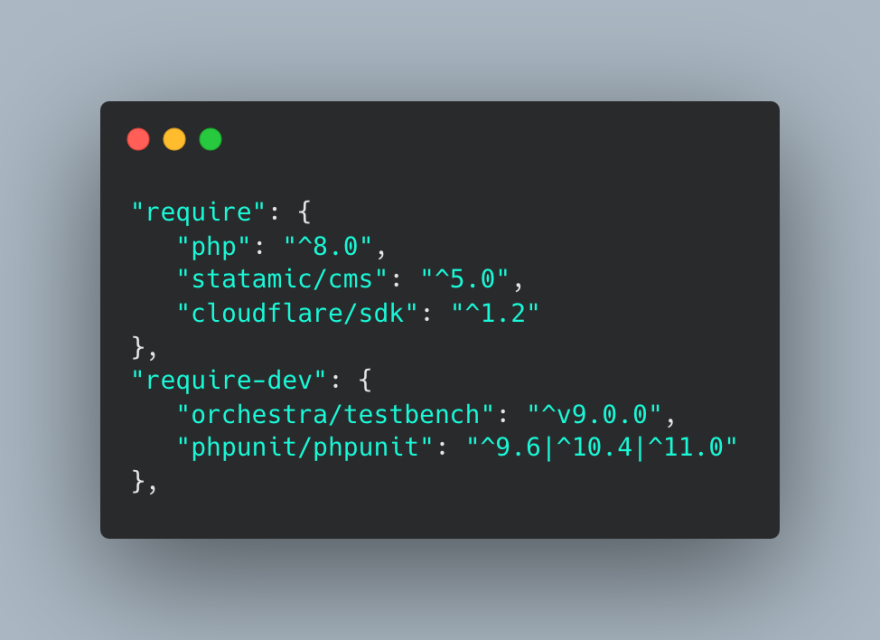
Once that is done, we should run composer update on our Statamic application to ensure those dependencies are correctly inserted into the vendor folder, which is being shared with our add-on.
Configuring the service provider
The next big step is to configure the service provider. We can register custom artisan commands, define the routes for our add-on, publish any resources or configurations, and register any listeners that our add-on can have.
![class ServiceProvider extends AddonServiceProvider
{
protected $commands = [
\BrewDigital\StatamicCloudflareAddon\Commands\CachePurgeEverything::class,
];
protected $listen = [
\Statamic\Events\EntrySaved::class => [
\BrewDigital\StatamicCloudflareAddon\Listeners\PurgeEntryUrl::class,
],
\Statamic\Events\EntryDeleted::class => [
\BrewDigital\StatamicCloudflareAddon\Listeners\PurgeEntryUrl::class,
],
];
public function bootAddon()
{
$static_cacher = config('statamic.static_caching.strategy');
if (config("statamic.static_caching.strategies.{$static_cacher}.driver") === 'cloudflare') {
$this->listen = [];
}
if (Cloudflare::isNotConfigured()) {
$this->listen = [];
}
parent::boot();
if ($this->app->runningInConsole()) {
$this->publishes([
__DIR__.'/../resources/config/statamic-cloudflare.yaml' => resource_path('config/statamic-cloudflare.yaml')
], 'config');
}
}
public function register(): void
{
parent::register();
Utility::extend(function () {
$utility = Utility::register('cloudflare')
->title(__('Cloudflare Manager'))
->navTitle(__('Cloudflare'))
->description('Purge Cloudflare from the comfort of your Statamic CP.')
->icon('earth')
->action([CloudflareUtilityController::class, 'showPurgeAll']);
$utility->routes(function ($router) {
// GET routes for rendering views
$router->get('/purgeAll', [CloudflareUtilityController::class, 'showPurgeAll'])->name('cloudflare.purgeAll');
$router->get('/purgeCollectionsPerZone', [CloudflareUtilityController::class, 'showPurgeCollectionsPerZone'])->name('cloudflare.purgeCollectionsPerZone');
$router->get('/purgeUrlPerZone', [CloudflareUtilityController::class, 'showPurgeUrlPerZone'])->name('cloudflare.purgeUrlPerZone');
$router->get('/settings', [CloudflareUtilityController::class, 'showSettings'])->name('cloudflare.settings');
// POST routes for handling form submissions
$router->post('/purgeAllPerZone', [CloudflareUtilityController::class, 'purgeAllPerZone'])->name('purgeAllPerZone');
$router->post('/purgeAll', [CloudflareUtilityController::class, 'purgeAll'])->name('purgeAll');
$router->post('/purgeCollectionsPerZone', [CloudflareUtilityController::class, 'purgeCollectionsPerZone'])->name('purgeCollectionsPerZone');
$router->post('/purgeUrlPerZone', [CloudflareUtilityController::class, 'purgeUrlPerZone'])->name('purgeUrlPerZone');
$router->post('/settings', [CloudflareUtilityController::class, 'updateSettings'])->name('settings');
});
});
Nav::extend(function ($nav) {
$nav->content('Brew Cloudflare')
->route('utilities.cloudflare.purgeAll')
->section('Settings')
->icon('settings-horizontal');
});
}
}](https://cdn.brewdigital.com/cache/containers/images/developing-your-own-statamic-add-on-insights-from-our-cloudflare-add-on-creation-process/carbon-%2814%29.png/816f507da822a3a6415f8febef7d9dff/carbon-%2814%29.png)
This is an example of how the service provider can look. Here, we have also defined a custom Statamic navigation item and a utility route. We are creating the routes with the Utility Facade to ensure they are protected by the Statamic middleware. Also, we are publishing the config file inside the resources folder into the main Statamic instance.
Managing configuration
Our add-on relies on a configuration file called statamic-cloudflare.yaml, but your own use case might vary. In this file, we store the credentials that will be used for the Cloudflare API and some settings for the add-on. Initially, we thought about using the Forma add-on to update the configuration easier but then opted to use a custom update process since we had some issues with the config caching.
![public function updateSettings(Request $request): RedirectResponse
{
$data = $request->validate([
'purge_everything_on_entry_save' => 'required|boolean',
'queued' => 'required|boolean',
'enable_in_local' => 'required|boolean',
'enable_in_staging' => 'required|boolean',
'enable_in_production' => 'required|boolean',
'zones' => 'nullable|array',
'zones.*.zone_id' => 'required_with:zones|string',
'zones.*.domain' => 'required_with:zones|string',
]);
if (empty($request->token) && (empty($request->email) || empty($request->key))) {
throw ValidationException::withMessages([
'token' => ['A token must be provided, or both an email and a key must be provided.'],
]);
}
try {
$configPath = resource_path('config/statamic-cloudflare.yaml');
$yamlContent = Yaml::dump(array_merge($data, $request->only(['token', 'email', 'key'])));
file_put_contents($configPath, $yamlContent);
return redirect()->back()->with('success', 'Settings updated successfully.');
} catch (\Exception $e) {
return redirect()->back()->withErrors('An error occurred while updating settings.');
}
}](https://cdn.brewdigital.com/cache/containers/images/developing-your-own-statamic-add-on-insights-from-our-cloudflare-add-on-creation-process/carbon-%2811%29.png/665f2d1f0f5d731441c743b51f46a502/carbon-%2811%29.png)
Extending the front end
On the front end, we extended the Statamic CP layout to have the navigation of Statamic. We also used the publish-forms that Statamic provides to be able to display the form in Statamic style and have the ability to perform actions without refreshing the page. It requires a blueprint, values, and meta that a blueprint has.
![public function showPurgeCollectionsPerZone(): View
{
$addonResourcesPath = __DIR__ . '/../../../resources/blueprints/';
$blueprintPath = $addonResourcesPath . 'purge_collections.yaml';
$collectionOptions = Collection::all()->mapWithKeys(function ($collection) {
return [$collection->handle() => $collection->title()];
})->toArray();
$zones = Cloudflare::zones();
return view('statamic-cloudflare-addon::purge_collection_per_zone', [
'blueprint' => $this->cloudflareHelper->loadBlueprintWithConfig($blueprintPath, [
'zones' => $zones ? $zones->flip() : [],
'collections' => $collectionOptions,
]),
]);
}](https://cdn.brewdigital.com/cache/containers/images/developing-your-own-statamic-add-on-insights-from-our-cloudflare-add-on-creation-process/carbon-%285%29.png/a046e1195bfd2bf6e7887be72c8c6231/carbon-%285%29.png)
Here is an example of how a view with a publish-form can look:
![@extends('statamic::layout')
@section('title', __('Cloudflare Manager'))
@section('content')
<header class="mb-3">
@include('statamic::partials.breadcrumb', [
'url' => cp_route('utilities.index'),
'title' => __('Utilities')
])
</header>
@include('statamic-cloudflare-addon::partials.cloudflare-navigation', ['activeTab' => 'purgeCollectionsPerZone'])
@php
use BrewDigital\StatamicCloudflareAddon\Cloudflare;
$isConfigured = Cloudflare::isConfigured();
@endphp
@if ($isConfigured)
<publish-form
title="Purge Collections Per Zone"
:blueprint='@json($blueprint["blueprint"])'
:meta='@json($blueprint["meta"])'
:values='@json($blueprint["values"])'
action="{{ cp_route('utilities.cloudflare.purgeCollectionsPerZone') }}"
></publish-form>
@else
<div class="py-6">
<div class="bg-yellow-100 border-l-4 border-yellow-500 text-yellow-700 p-4" role="alert">
<p class="font-bold">{{ __('Notice') }}</p>
<p>{{ __('The Cloudflare addon is not enabled or configured for the current environment. Some features may not be available.') }}</p>
</div>
</div>
@endif
@endsection](https://cdn.brewdigital.com/cache/containers/images/developing-your-own-statamic-add-on-insights-from-our-cloudflare-add-on-creation-process/carbon-%2812%29.png/1cb6384edeb81646bc46abe39d8e9b4a/carbon-%2812%29.png)
The code of the Brew Cloudflare add-on is open source, and you can see exactly what it does as a guideline. Once you have the new add-on working, you can separate it from Statamic into a different location and include it inside the project via composer. This is a good practice to have the add-on hosted inside a different repository, for example, Nexus.
To link the add-on inside your main project composer, you will need to modify the composer.json file with the following changes:
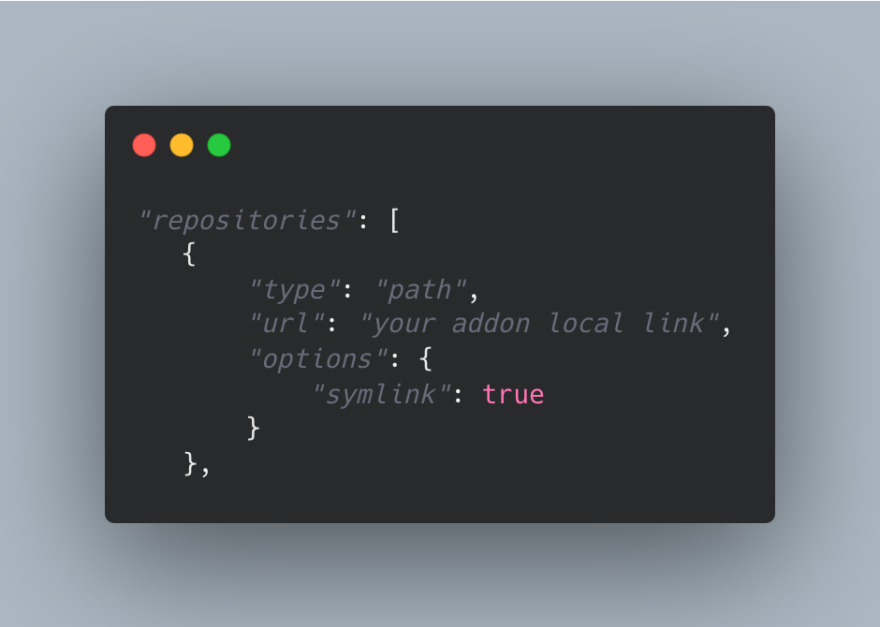
After modifying that, run composer update, and the main Statamic installation composer should point to the custom add-on path.
Testing your add-on
To test your add-on, you should run composer inside the add-on directory to pull down the orchestra packages. After that, it is important to correctly set up the TestCase file for your tests to mimic a potential Statamic installation.
First, we set the application configuration and use Manifest to register your add-on inside the Statamic instance. Also, create a helper function asAdmin to be able to access the CP routes. To have Statamic available inside the testing instance, we need to register its provider and the provider of our add-on.
A basic E2E test can look like this:
![public function testShowPurgeAllRoute()
{
$mock = Mockery::mock('alias:' . Cloudflare::class);
$mock->shouldReceive('loadConfig')
->andReturn([
'enable_in_local' => true,
'email' => 'your-email@example.com',
'key' => 'your-api-key',
'zones' => [
['domain' => 'example.com', 'zone_id' => 'your-zone-id']
]
]);
$mock->shouldReceive('isConfigured')
->andReturn(true);
$mock->shouldReceive('zones')
->once()
->andReturn(collect(['zone1' => 'Zone 1', 'zone2' => 'Zone 2']));
$this->app->instance(Cloudflare::class, $mock);
$this->asAdmin();
$response = $this->get(route('statamic.cp.utilities.cloudflare.purgeAll'));
$response->assertStatus(200);
$response->assertViewIs('statamic-cloudflare-addon::purge_all');
$response->assertViewHas('zones', collect(['zone1' => 'Zone 1', 'zone2' => 'Zone 2'])->flip());
}](https://cdn.brewdigital.com/cache/containers/images/developing-your-own-statamic-add-on-insights-from-our-cloudflare-add-on-creation-process/carbon-%2810%29.png/2b6c15ff3d67e0b3f76662a51c864614/carbon-%2810%29.png)
This blog used Brew Digital’s new Cloudflare add-on as the basis, but your implementation will vary depending on the functionality of your add-on.
Download our Cloudflare add-on
If our add-on sounds useful, then we have released it on both Packagist and Github for people to freely download and implement in their own Statamic builds.
Happy coding!